Question:
I have my existing data in FastMaint Standard / FastMaint Professional and would like to transfer it to FastMaint Web. How do I do this?
Solution:
The instructions here will help you upgrade from FastMaint Standard / Professional 4.5 or above. If you have an earlier version of FastMaint Standard/ Professional you will need to first upgrade to the current version of FastMaint Standard / Professional (the trial version will do). Once this is done you can then follow the instructions below to upgrade the current version of FastMaint Standard / Professional to FastMaint Web.
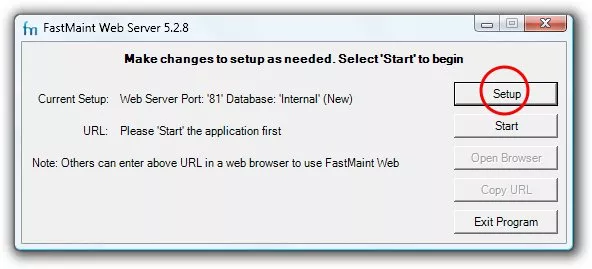
Please use the following steps to upgrade from FastMaint Standard/ Professional edition to FastMaint Web edition. This will allow you to transfer over your existing data. First install FastMaint Web, do not start it or configure it. Shown below is the start screen of FastMaint Web. DO NOT click on the “Start” button before you have clicked on the “Setup” button to finish the configuration changes explained below. You can see the Related Issues list below for installation instructions.
Have FastMaint Professional and use an external SQL Server database?
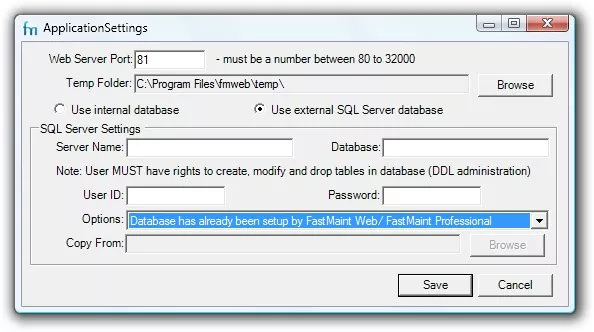
In this case the upgrade is quite easy. First make a copy or take a backup of your existing FastMaint Professional database on SQL Server. Once FastMaint Web upgrades the database you will no longer be able to downgrade the database to FastMaint Professional (you will need to restore the backup or database copy). Install FastMaint Web. On the main screen of the built-in web server click on the “Setup” button. Select the option “Use external SQL Server database“. Enter the SQL Server name, Database name, User name, passwords, etc. In the drop-down box for “Options” make sure to select the option “Database has already been setup by FastMaint Web/ FastMaint Professional“. Click “Save” to save your changes. Once you return to the main window, click on the “Start” button to start the built-in server. Follow the prompts to open a browser window and confirm that the data is correct.
Have FastMaint Standard/ Professional and use the built-in MS Access database?
1. Make a copy or take a backup of your existing FastMaint database (see the “Related Issues” list below if you need to know how to do this).
2. Install FastMaint Web. Do not click on the “Start” button of the built-in web server to start it. Instead on the main screen of the built-in web server click on the “Setup” button. Important! If you accidentally click on the “Start” button, the web server will be configured with default values. You will have to uninstall FastMaint Web and reinstall it once again to proceed to the next step below.
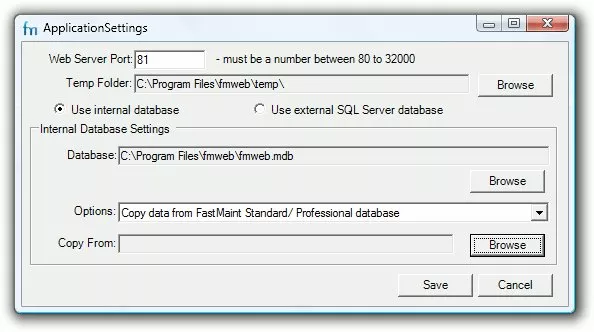
3. Make sure the option “Use internal database” is selected. In the drop-down box for “Options” make sure to select “Copy data from FastMaint Standard/ Professional database“. NOTE: If you cannot see this option FastMaint Web has already been set up which is why it is not available. You may have set up FastMaint Web in the default configuration by clicking on the “Start” button previously. If this is the case, uninstall FastMaint Web (just run the software uninstaller, no need to make Microsoft IIS changes). Then re-install it using the same folder as before. After doing this you can proceed with these instructions.
4. Click on the “Browse” button below the “Options” drop-down to locate the FastMaint Standard/ Professional database. For FastMaint Standard the database file “FastMaint.mdb” will be in the program install directory (usually “C:\Program Files\fastmaint” OR on 64-bit systems “C:\Program Files (x86)\fastmaint“). For FastMaint Professional the database file “FastMaint.mdb” will be in the shared drive location you specified when setting up FastMaint Professional (you can check the FastMaint.ini file found in the program install directory if you do not remember where it is).
5. Once you have specified the location of your FastMaint Standard/ Professional database, click “Save” to save your changes and complete the data transfer. Once you return to the main window, click on the “Start” button to start the built-in server. Follow the prompts to open a browser window and confirm that the data has been correctly transferred. NOTE: if you have more than two concurrent users in FastMaint Web it is recommended that you use an external SQL Server database. You can go back to the “Setup” feature in the built-in web server to transfer the data over to an external SQL Server database you created. See the FastMaint Web installation instructions in the Related Issues below for information on how the SQL Server database should be created.
6. If you are no longer using FastMaint Standard/ Professional you may uninstall it at this time.
IMPORTANT! The recommended way to run FastMaint Web is on Microsoft’s Internet Information Server (IIS). The built-in web server runs as a user program and is subject to shutdowns/ timeouts when the user logs out or does not use the computer for some time.Once you have completed the steps above, please see the related issues list below to see how to run FastMaint Web on IIS as well as how to backup & move the database (if you need to install on a different computer to run IIS).
Related Issues
- How do I make a copy of my maintenance database? How do I restore a backup?
- How can I upgrade/ update from an older version of FastMaint?
- What is FastMaint Web? How is it different from FastMaint Standard/ Professional?
- How to set up FastMaint Web on Internet Information Server (IIS) instead of the built-in web server?
- How can I install FastMaint Web edition?