1. Before you begin
IMPORTANT: If you are going to have three or more concurrent users or a large database you should use a Microsoft SQL Server database to avoid performance and data issues. Even the free Microsoft SQL Server Express editions will work.
If you are doing a trial evaluation you can start with the built-in database. Later on use FastMaint Web itself to copy over the data to an external SQL Server database (run the built-in web server, click Setup button, select Use external SQL Server database, select copy data option from Options dropdown).
a) Doing a trial evaluation of FastMaint Web?
If you are doing a trial evaluation of FastMaint Web and it is just yourself who will do the evaluation you can install FastMaint Web using your normal user account. If others are also going to use FastMaint Web you should login with an administrator account and install FastMaint Web (the Windows firewall will not allow them to access FastMaint Web running under your account).
b) Trying to upgrade from FastMaint Standard / Professional to Web edition?
Please see the article “How can I upgrade from FastMaint Standard/ Professional to FastMaint Web edition?” found in the Related Issues list at the bottom of this article.
c) Want to use Microsoft SQL Server for the database rather than the built-in Microsoft Access database?
You should already own licenses for Microsoft’s SQL Server (or get the free SQL Server Express edition from the Microsoft website). Make sure that SQL Server is setup to use mixed mode authentication (windows authentication AND database user accounts). FastMaint Web needs a database user account to connect. Once you set up SQL Server, create an empty database on it for use with FastMaint. Create a database user account that has DDL administration as well as read+write access to the database (avoid using the SQL administrator account for security reasons). Make sure that the database recovery mode is Simple (the default SQL Server setting). Remember that regular database backups should be done.
NOTE: If you are created the database on SQL Express edition turn off AutoClose. Databases created on SQL Server Express are set to AutoClose ON by default.
You can turn AutoClose off on the database by opening it in the SQL Server Management Studio and running the following query on the database (e.g. named FastMaintDB):
ALTER DATABASE FastMaintDB SET AUTO_CLOSE OFF;
2. Installation Process
Make sure that the Microsoft.NET 4.5 or later is installed on the computer. If you do not have it installed you can download it from:
https://www.microsoft.com/en-us/download/details.aspx?id=30653
Run the FastMaint Web installer to install FastMaint Web. You can use the default options provided by the installer. After installation, the installer will give you the option to run FastMaint Web (you can also start it using the program icon on the Windows Desktop OR the Windows Start menu, Programs sub-menu). Start FastMaint Web to bring up the FastMaint Web server. It will have the screen below. DO NOT click on the “Start” button before you have clicked on the “Setup” button to finish the configuration changes explained below.
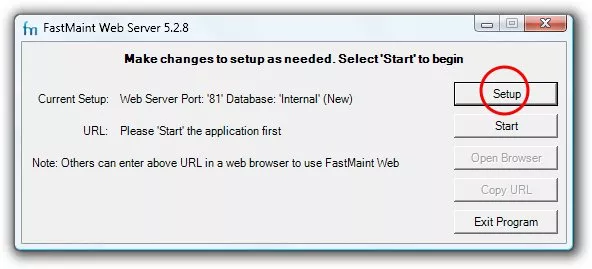
3. Setup The System
Click the Setup button to bring up the screen below. Make any changes if needed to the default options – normally you will need to change only the database selections.
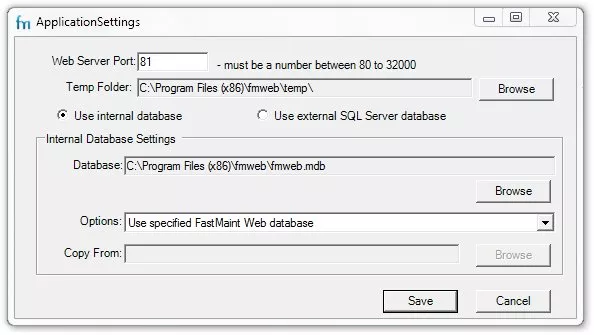
Internal database: Use this selection if you want to use the built-in Microsoft Access (Jet) database. Make any changes if needed (the defaults are usually fine). Click “Save” when done and the Setup window will complete the database setup.
External SQL Server database: Follow the instructions to use an external SQL Server database. For a new installation point to the new database you previously created so that it can be initialized. If you are upgrading an existing FastMaint Standard/ Professional installation chose the appropriate option (copy from internal database to the new SQL Server database you previously created OR upgrade existing SQL Server database). Click “Save'” when done and the Setup window will complete the database setup.
4. Finalize & Start Using
After database setup you will return to the main screen of the FastMaint Web server. At this point you can choose to start the built-in server and begin using FastMaint Web (for testing purposes). Confirm that you can login to the application. If you get any errors like missing libraries/ assemblies check to make sure that ASP.NET 4.0 or above is enabled on the system (it can be installed but not enabled).
If this is just a test system to evaluate FastMaint Web and you are also going to be the maintenance administrator of the system you can complete the initial system settings (work order numbering, purchase request numbering, demo database, etc.) – otherwise logout and provide this account to the maintenance administrator and they can do this as well as create the user accounts.
If this is going to be a production/ live system logout of the application. Then shut down the FastMaint Web server (select the exit button). Production/ live systems should run FastMaint Web using Microsoft’s Internet Information Server (IIS). Since IIS runs as a service this will ensure that users are able to access FastMaint Web even when no one is logged into the server computer. Please see the article on how to do this in the Related Issues list at the bottom of this article.