When are work orders created (work order # assigned)? FastMaint automatically schedules work orders (i.e. calculates work order dates) for most types of tasks, however you still have to create them (the work order # will be assigned when created). You can create these work orders by running the Planning Report for the work order dates (click the Plan button). Alternatively look in the work order list on the main window for work orders with an empty status and open the work order to create it. For tasks with a frequency of "Unplanned" or "Alarm" you have to use the Requests/ Breakdown function to schedule (& create) unplanned task work orders or enter alarm conditions which will schedule (& create) any work orders based on the alarm condition. |
Instructions
•Complete the form (see below) and click Save.
(Alternatively, click Cancel to abandon your changes. Any scheduled task will still remain scheduled.)
You can also use the Delete button to remove the current work order (It will still be scheduled by FastMaint if the work order is not based on an Unplanned frequency task. Set the work order status to "Canceled" if you do not want it in the schedule). Use Email to email the work order to all the people associated with the work order. Use Print to print the work order - when the print window pops up, you can select the Print all linked documents to print all supporting documents required for the work order.
Listing
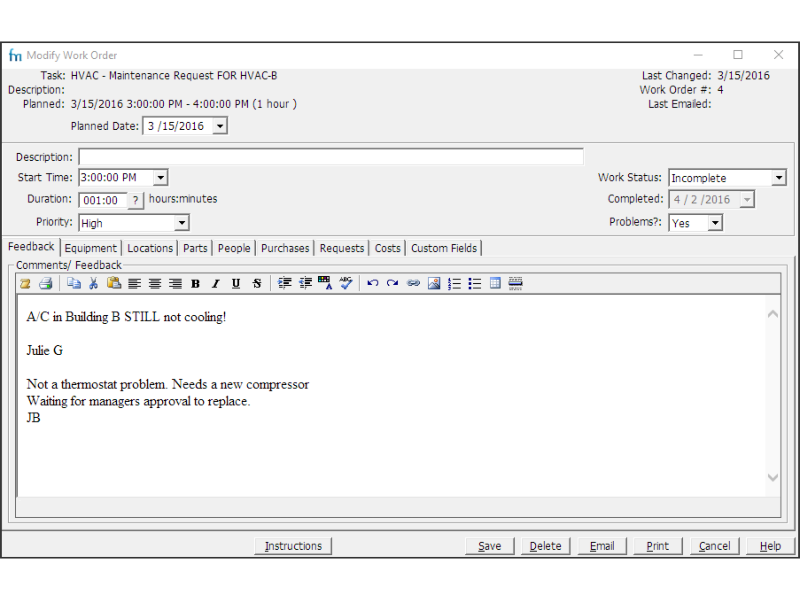
•Task Name and Description: From the original task. (You can't edit this.)
•Last Changed: For tracking purposes, shows when this work order was last changed. (You can't edit this.)
•Work Order #: Automatically assigned when the work order is created (will be "N/A" until you click Save). This number can be used to locate the work order using the Find button on the main window. (You can't edit this.)
•Last Emailed: For tracking purposes, shows when this work order was last emailed. (You can't edit this.)
•Planned: Date & time this task was planned for.(You can change this only for work orders based on an Unplanned frequency task.)
•Description: More information about the task.
•Start Time Actual start time.
•Duration: Actual duration of work.
•Work Status & Completed: Current status of the work. If it is completed then enter the completed date. If the work order is canceled then enter the date it was canceled.
If the Work Status is changed to "Started" "Incomplete" or "Completed", the quantity in stock for all parts needed for this task will be appropriately reduced. If the Work Status is changed from "Started", "Incomplete" or "Completed" to "Planned" or "Planned (Requested)", the quantity in stock for all parts used for this task will be increased since the parts will not yet have been used.
•Priority: The priority for the task.
•Problems: Wether there were any problems when executing this work order.
•Feedback tab: The place for any additional information. You can format the instructions with paragraphs and spaces to make them easy to read when displayed or printed on reports. See HTML Editor for how to insert links, pictures, etc.
•Equipment tab/ Locations tabs/ Parts tabs/ People tabs: Use these tabs to associate particular equipment, locations, parts and people with the task. In each, use the Add button to open a list, select the check boxes then click OK.
•Purchases tab: Any purchases required for this work order. You can also create new purchases here and fill them with parts required on the work order.
•Requests tab: Any work requests assigned to this work order.
•Costs tab: Records the Labor Cost (cost of people needed), Material Cost (cost of parts needed) and Other Cost (any other costs involved). Depending on the settings in the original task, these are usually calculated automatically for you based on the Duration, and contents of the Parts tab and the People tab.
•Custom Fields tab: Enter specific information not covered in the other tabs. In the main window, select Administration, Define Custom Fields to add fields, e.g. customer number, contact person, contract renewal date, etc.
•Instructions button: Review task instructions (can be changed only by editing the task).